Welcome to Animation 11!
Video Tutorials are included for each of the lessons, they are shown here as links, just copy and paste into your browser window to watch them. You will need to be logged in to your [email protected] google account to be able to access these videos.
I look forward to working with you and helping you to develop your skills in Animation!
I look forward to working with you and helping you to develop your skills in Animation!
Assessment:
Below is the assessment rubric that will be used for animation projects. Pay particular attention to the categories and ensure that you are including these elements in your completed animations. For example: in the ping pong assignment you will include squash and stretch with the ball, anticipation with the movement of the hands prior to serving, Staging for the setting that is created, Secondary action for the free hand moving back as the paddle is swung forward and exaggeration for an over-the-top swing or smash to finish the round. In fact, for the ping pong assignment you can include every single piece of criteria, adding emotion through the movement and pacing of the game.
You may download the file below if you wish to have a copy while you are working on your project.
You may download the file below if you wish to have a copy while you are working on your project.
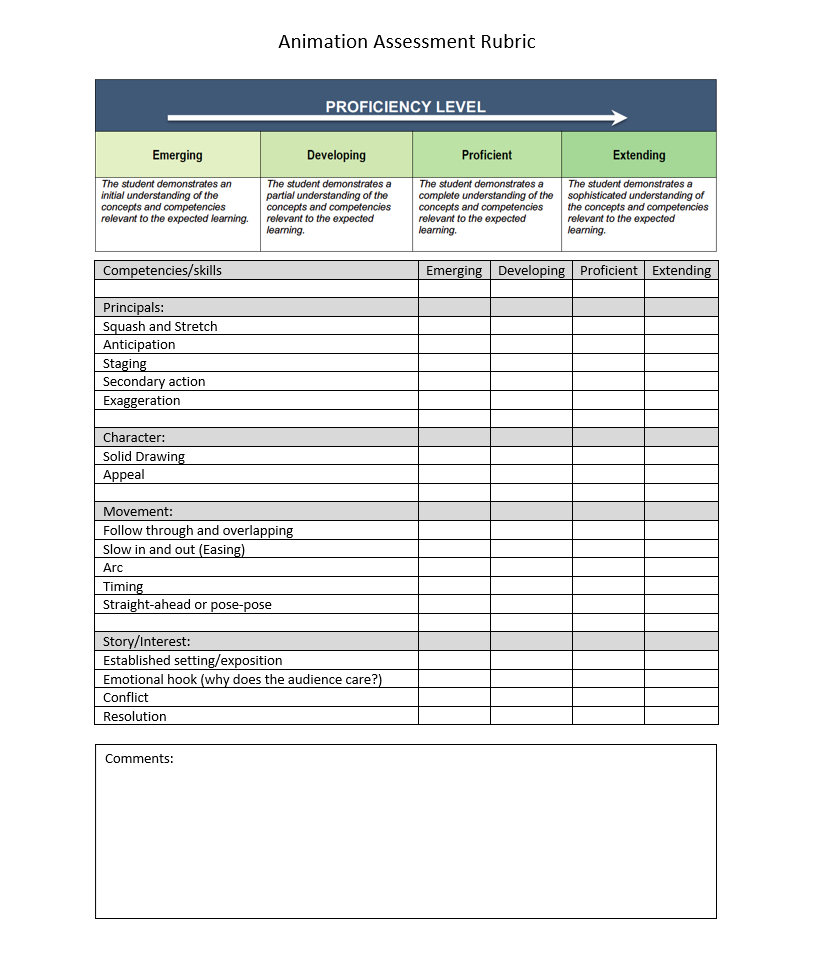
| animation_assessment_rubric.docx |
Assignment 1 - Ping Pong
01 - Introduction to Adobe Animate - how to set up tools -
02 - Drawing tools in Animate, and how to set up the ping pong animation -
03 - Motion Tweens: moving the ping pong ball naturally-
04 - Drawing and animating the Hand and Paddle-
05- Hand Drawn effects-
06- Squash and Stretch ping pong ball-
Assignment 2 - Free Form Animation
07- Set up of the Free Form Animation assignment, sourcing audio and starting to animate-
08- Free form tweens *Warning- the first minute of this tutorial the screen flashes a lot, if you struggle with strobing effects, minimize the window, listen to the audio and wait until after the 1 minute mark before maximizing the window again*-
If you need assistance with this, please check in with Mr. Kramer.
If you need assistance with this, please check in with Mr. Kramer.
09- Using the tween editor in the timeline to create custom easing of movement, using reverse frames to complete a full sequence (ball bounce or opening and closing a door) -
10- Converting audio to import to animate, cutting audio length, adjusting levels in the timeline and moving audio to sync with action in the timeline -
11- Zoom in/out, Pan and Rotate camera view in the timeline using motion tween -
12- Asset Warp Tool to modify the shape of drawing objects, and modification of the classic tweens with easing tool -
Assignment 3 - Cute Bouncer
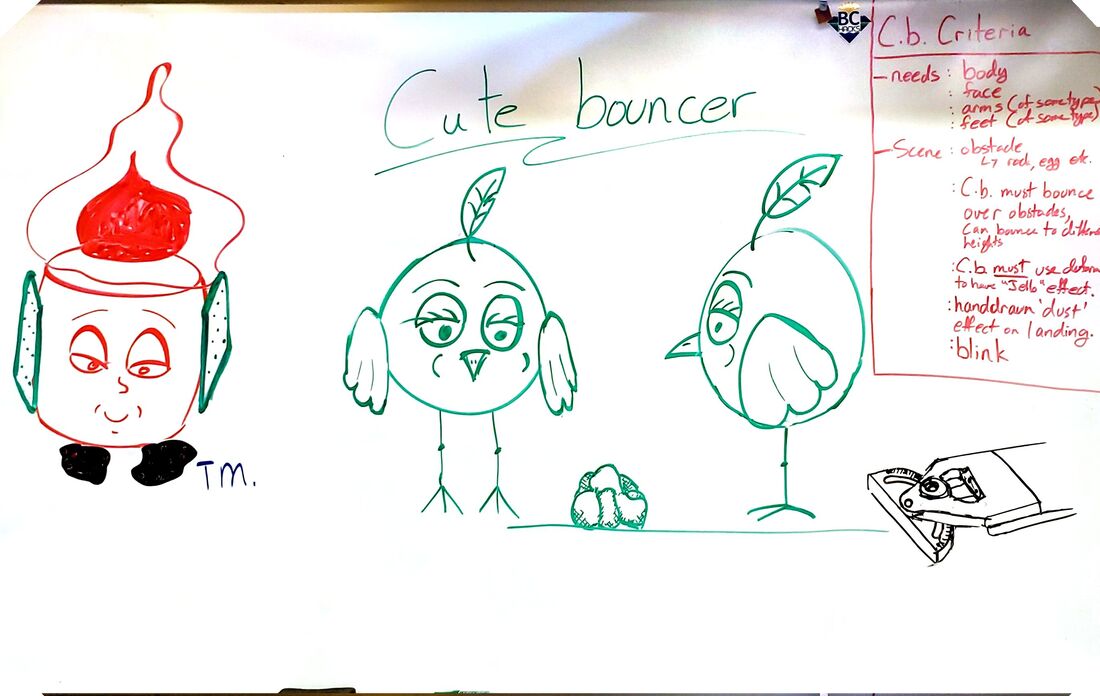
-The above video shows how to set up a file and animate a ball that is bouncing up and down to act as an example of your cute bouncer movement. Do this first to get the bouncing action looking natural. You may need to add a few frames at the top of the bounce to give your character more time if they are looking over a ledge, out a window, etc. This will be the template that you use for the rest of the bouncing animation.
13- Set up of cute bouncer on layers, use of drawing objects, creation of example bouncing object to use as a template for our bouncer -
14-Animation of the Cute Bouncer body following the movement of the bouncing ball guide-
15-Animation of the Cute Bouncer feet and face-
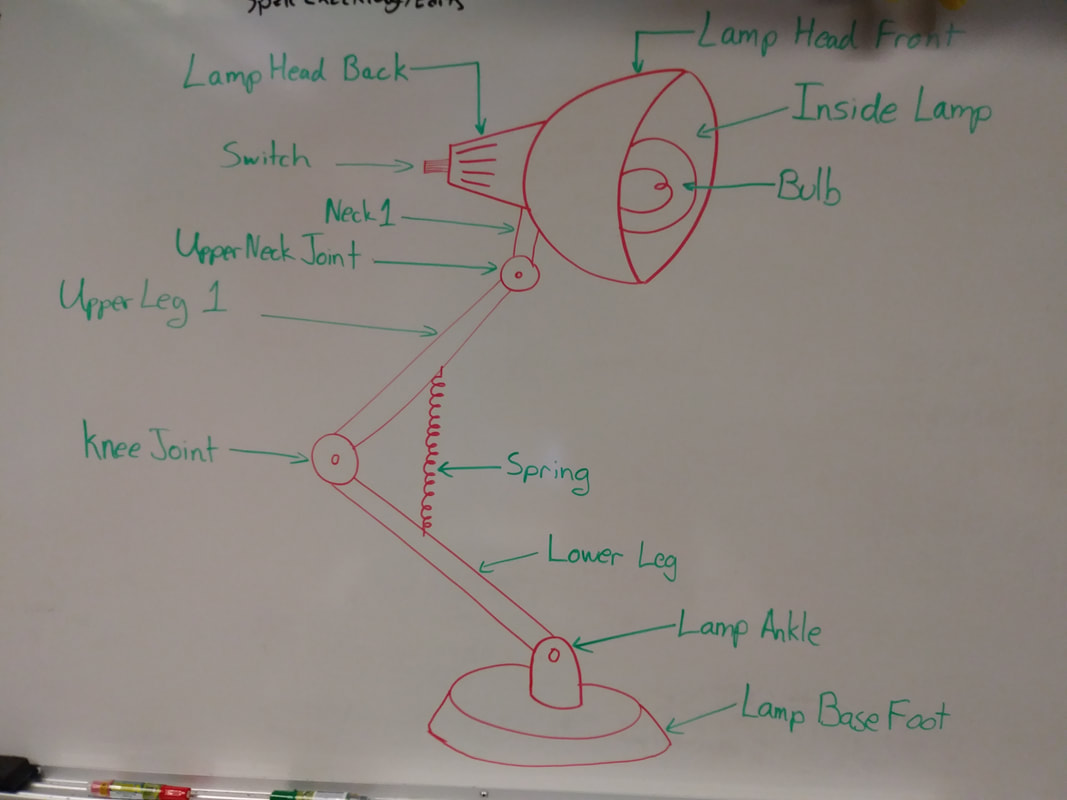
Assignment 4 - Lamp/Rigged Project
16-Set up of lamp project. setting up layers, creating and saving swatches and using different brushes-
17-Rigging with the bone tool, using the asset warp tool to warp bendable objects, animating the armature tween-
18-Drawing the setting, creating an establishing shot creating a timing layer and beginning to animate-
19-Adding easing to the armature layer, ensuring that the motion is natural and not robotic-looking-
20-Animating the jump using guidelines and easing. Gathering/anticipation and follow-through demonstrated to show application of force-
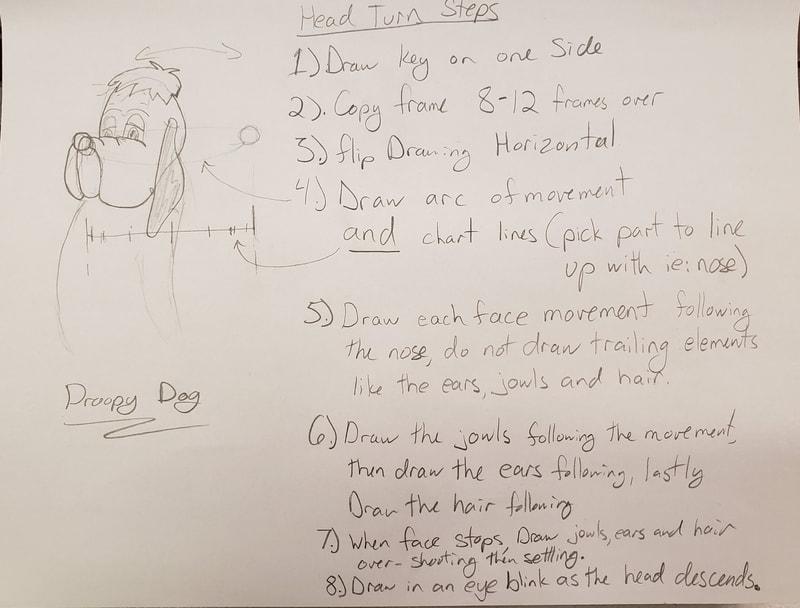
Assignment 5 - 2D Head turn
Design a character (torso and head) that has elements that will follow the action ie: hair, earrings, jowls, hat etc.
Create a setting and a reason for the character to turn their head ie: playing poker and looking at the other players, watching a homerun go out of the park etc.
Hand draw the character in animate using a tablet, follow the instructions in the picture below to create your characters head turn.
Create a setting and a reason for the character to turn their head ie: playing poker and looking at the other players, watching a homerun go out of the park etc.
Hand draw the character in animate using a tablet, follow the instructions in the picture below to create your characters head turn.
Example wavy animations:
| animating_wavy_things_is_hard.mp4 |
Please view the video above to see examples of animating wavy motion such as hair or a wagging tail etc.
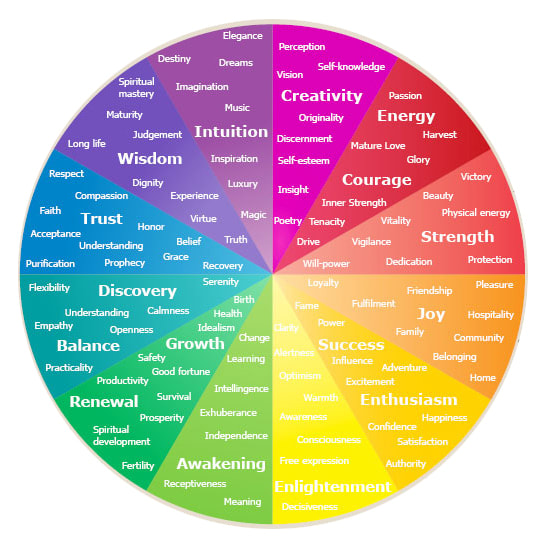
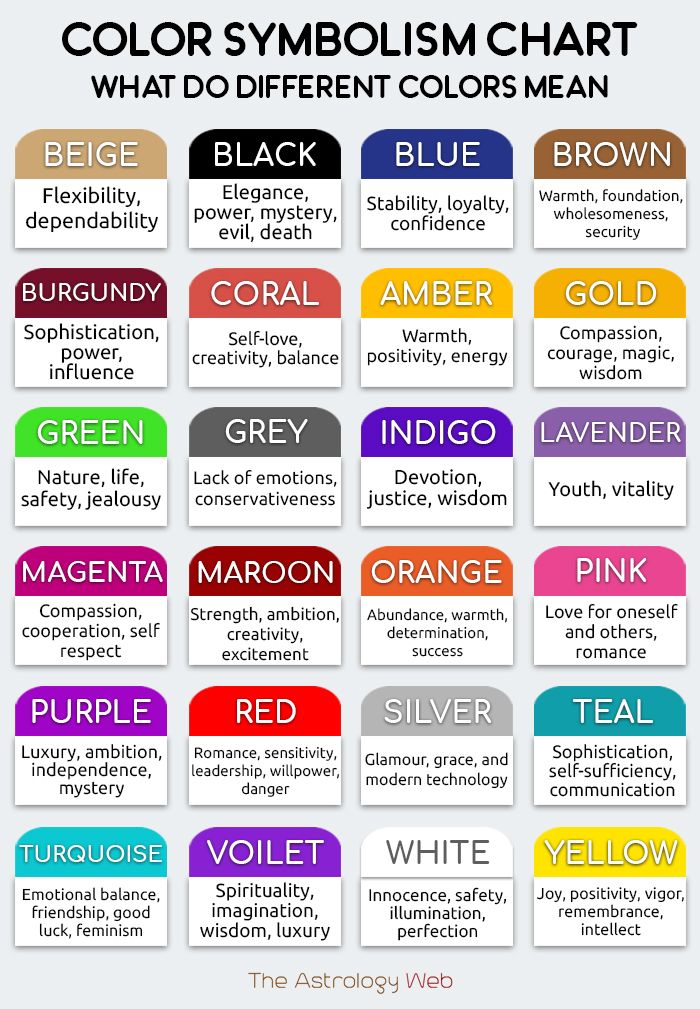
Colour Wheel for Character Design:
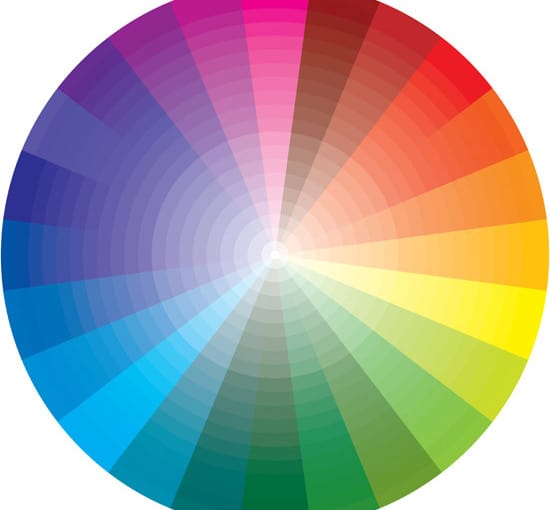

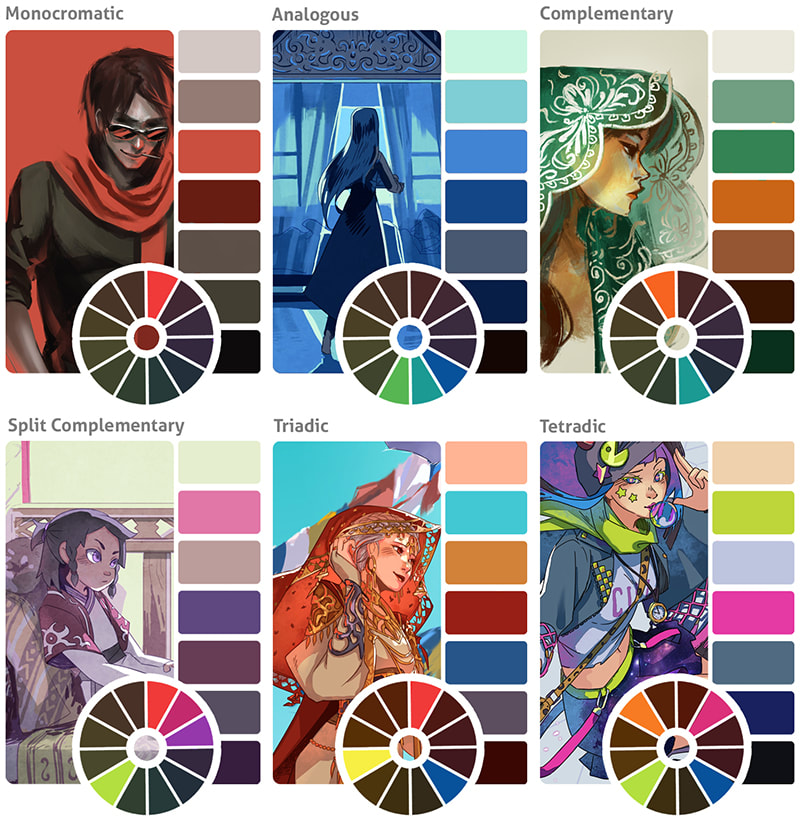
Images above from: https://www.neverpaintagain.co.uk/blog/paint-colours/
https://gavintigertimes.wordpress.com/2015/11/06/colors-meanings/
and
https://www.clipstudio.net/how-to-draw/archives/156922
Another good source for character colour theory: https://111426studio.wordpress.com/2015/11/30/the-role-of-colour-in-character-and-scene-design/
and:
https://wildfiregames.com/forum/topic/23006-color-theory/
Assignment 6: Flour Sack Project:
| storyboard_16_x_9.docx |
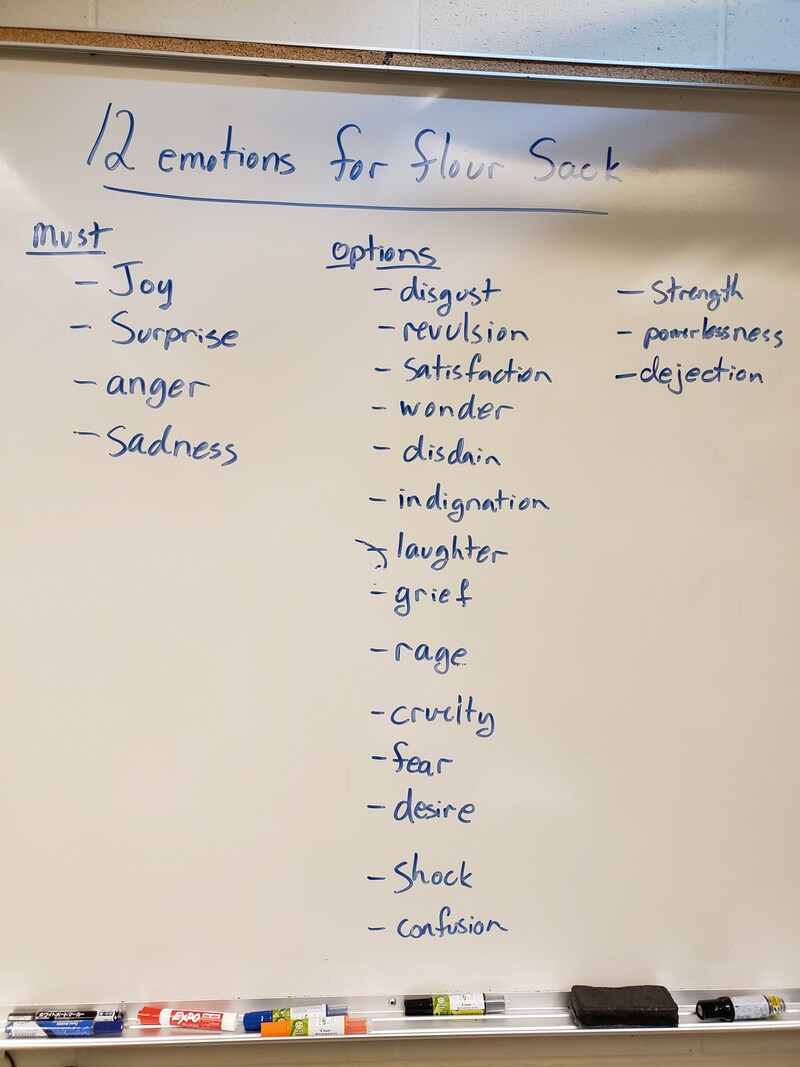
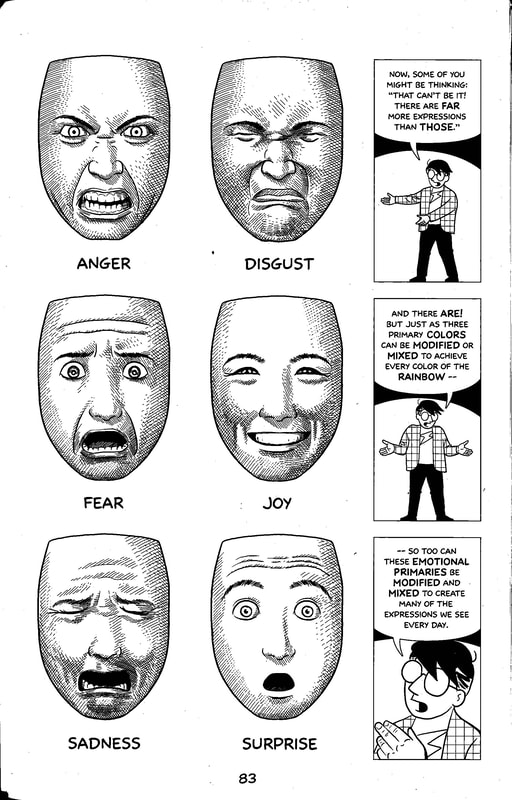
Draw 12 flour sacks in different emotional states:
Using the picture below, select 12 different emotional states: 4 from the must column and then the remainder from the options column (you can also come up with your own).
Flour Sack Breakdowns. Animate the breakdown frames of your flour sack. These are frames where the action is modified but isn't a key. Examples: a key is jumping, mid-jump and landing. A breakdown would be anticipating the jump, anticipating the landing, showing surprise mid-jump, etc.
Flour sack inbetweens. Using chart lines for movement, fill in the inbetweens of the flour sack animation. After you have finished the inbetweens, then you need to do a clean pass, and add fills and shading. Watch the tutorials below to see how to add these parts to your animation. When you have completed all of these steps for the entire animation, hand in to the classroom.
Emotions:
The six primary emotions for drawing human faces:
Source: Making Comics by Scott McCloud
Source: Making Comics by Scott McCloud
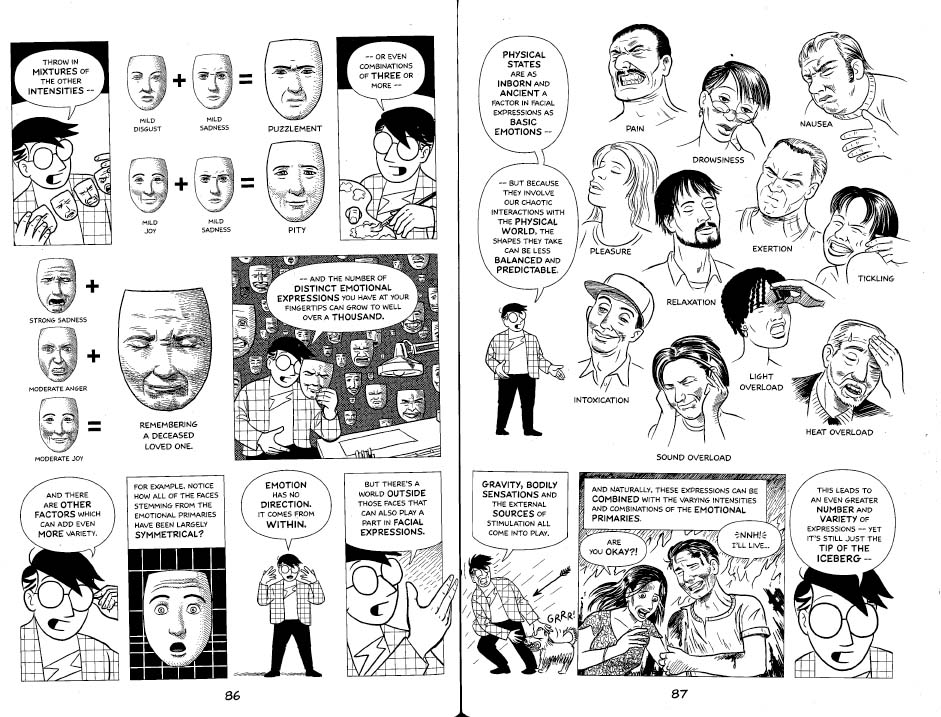
Examples of combinations of primary emotions to add nuance to your characters' emotional state:
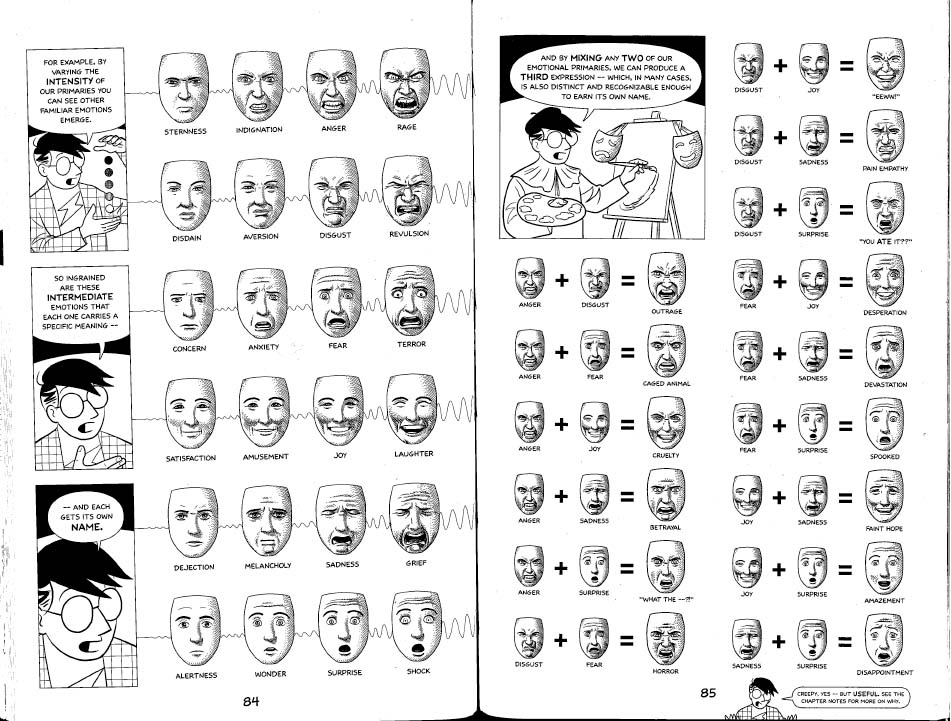
Adding intensity of multiple emotions changes the feeling, as well as changing the angle of the face and the position of the character:
Final Project
Using the skills that you have learned in Animation 11, create a 15 second long animation that tells a story. Look on Youtube for "animated short" to get an idea of telling a story in a compressed time frame. You will need to include the following:
Opening screen
character
Setting and exposition (where is the character and what are they experiencing?)
rising action (what tension is being created in the scene to make the audience care about this character?)
climax (final conflict between your character and the elements of tension in the story)
falling action/resolution (how is the conflict resolved in the end?)
Credits
You will use either Adobe animate, or another animation program of your choice to animate this short.
Storyboard Template:
| storyboard_16_x_9.docx |
Story Structure Layout:
| storystructure.pdf |
Everything Up To Here Has Been Updated
The Grade 11 Section Below is Not Updated Yet (If You Are In Animation 12, Scroll To the Bottom)
03 - Character Design Assignment - Using the drawing tools shown, create your own three-quarter profile character that is full standing and clothed. Use fill colours and add details like accessories, hair, etc. For examples, look at the following file.
Must include:
Hand in in I:/Handin/Kramer/animation 11 12/01 character
Due date: Feb 14
Must include:
- Full face details
- Hair
- Clothing
- Two arms, two legs, two feet
- All elements of character must be filled with colour
- Character must be of original design, do not copy an existing cartoon character
Hand in in I:/Handin/Kramer/animation 11 12/01 character
Due date: Feb 14
| 03_-_character_design.docx |
04 - Bouncing Ball exercise - follow the instructions in the following file to set up your project and animate the bouncing ball. Make sure that you include the guide line and chart lines on separate layers. When completed, hand in to the handin folder.
Must include:
The end of this tutorial has information on the free form animation, watch the included videos for inspiration!
Due date: Feb 21
Must include:
- Chart Lines /2
- Guide Lines /2
- Background/1
- Surface that the ball falls from /1
- 120 frames minimum of animation /1
- At least 4 bounces /1
- Squash and Stretch /2
The end of this tutorial has information on the free form animation, watch the included videos for inspiration!
Due date: Feb 21
| 04_-_bouncing_ball_with_free_form_animation.docx |
05 - Free form animation assignment criteria and examples. Watch the videos, find an audio clip and create a 15-20 second animation that moves to the beat!
Must include:
This tutorial also has information on moving the camera, zooming in and adding transparency to objects in your drawing.
Due date: Feb 21
Must include:
- 360 Frames of animation /3
- Overlapping action (multiple layers animated at the same time) /3
- Background colour /1
- Synchronized movement to the beat / 3
This tutorial also has information on moving the camera, zooming in and adding transparency to objects in your drawing.
Due date: Feb 21
| 05_-_free_form_and_camera_movement.docx |
Break Project: Cute Bouncer!
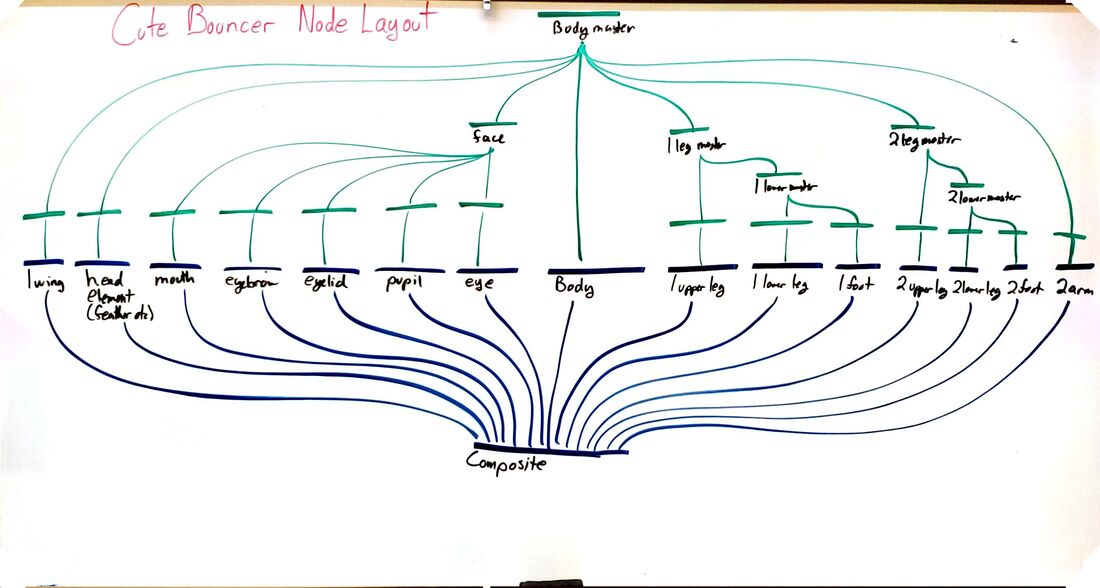
This project is to be completed using an envelope deformer on the body. You will work on the concepts of squash and stretch as your cute bouncer jumps over obstacles in it's path. Pay particular attention to the following pictures as they include examples of cute bouncers, and a rough outline of the node layout for the animation.
Criteria:
Character includes: Body, Face (including eyebrows, eyelids, pupils, eye background), arms (of some description), feet and/or legs (of some description)
Scene must include: Moving obstacle that the bouncer jumps over (character can bounce to different heights), body of C.B. must have an envelope deformer on it to apply squash and stretch (exaggerate this for a jello mold effect), include a hand drawn 'dust' effect on the character landing and finally include a blink.
The eyelid is drawn as a separate layer, so it will be fairly easy to animate the blink.
Enjoy!
06 - Drawing the Lamp. You will start with an existing lamp(download the lamp_student_package_v1 below), then draw your own based on that design.
| lamp_student_package_v1.tpl.zip |
| 06_-_creating_the_lamp.docx |
07 - Rigging the Lamp. You will follow the tutorial to place the animation pegs at the pivot points of the lamp rig. Follow the instructions carefully as this will dictate how your lamp is articulated for the animated jump.
| 07_-_rigging_lamp_pegs.docx |
08 - Lamp details. Add specific details to your drawn lamp to give some dimension and depth to the character.
| 08_-_details_on_lamp.docx |
09 - Lamp Textures. Add textures to different elements of the lamp to give the illusion of light, shade, dust etc.
| 09_-_texturing_lamp.docx |
10 - Lamp Keys. We finally start animating the lamp! We will create a guide line like the bouncing ball and set the lamp at each of the keys (top of bounce and settle on the ground).
| 10_-_lamp_keys.docx |
11 - Lamp Inbetweens. We will create chart lines like we did with the bouncing ball, then animate on two's to move our lamp through the jump cycle. Pay particular attention to making the lamp collapse on contact with the ground, anticipate the next jump, and then launch itself up into the next arc. Like the bouncing ball, the lamp will be travelling it's slowest at the highest point of the arc, and fastest as it hits the ground. When the lamp jump is completed you will hand in to the handin folder.
The first video explains how to do the inbetweens, the second video describes the process of adjusting the spring using the deformer tool.
Must include:
Due date: March 6
The first video explains how to do the inbetweens, the second video describes the process of adjusting the spring using the deformer tool.
Must include:
- Fully drawn, textured and rigged lamp / 5
- Chart Lines and Guide Lines / 3
- Articulated Keys (on jumping and landing the lamp absorbs impact) /5
- Natural inbetweens (Lamp hangs in the air at top of jump, accelerates as it falls) / 3
- Background /1
- Overlapping action and antic(add personality to the lamp) /3
Due date: March 6
| 11_-_lamp_inbetweens.docx |
12 - Creating and Rigging your own character. Follow the tutorial to create your own character in 3/4 profile or straight profile, then rig all of the character joints. We will use this rig to create a walk cycle with our character. When the walk cycle is completed you will hand in the project file to the handin folder.
Due date: April 20
Due date: April 20
| 12_-_rigging_your_own_character.docx |
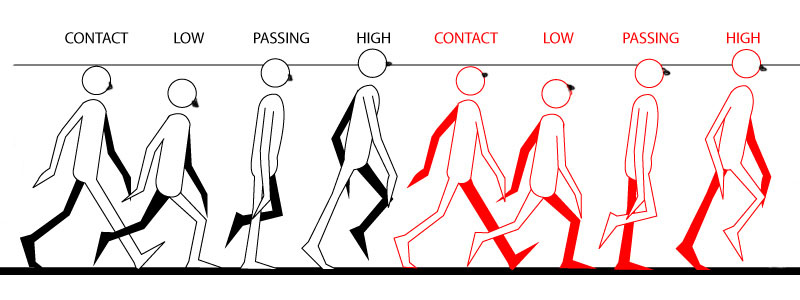
Walk Cycle Instructions: Note the head and floor lines! (this should be over 24 frames)
Step 1: Body and Head
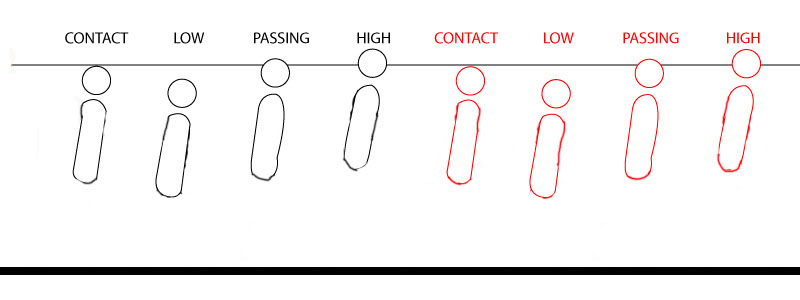
Step 2: Front Leg
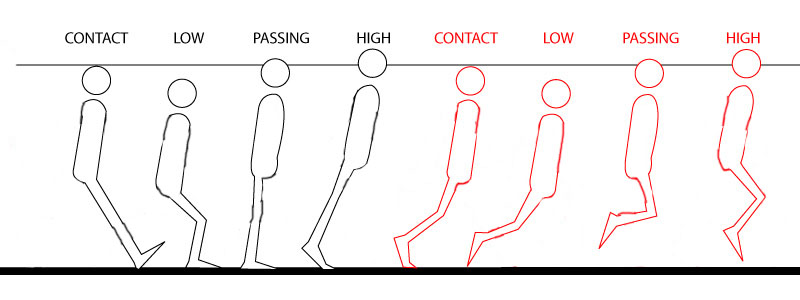
Step 3: Both Legs
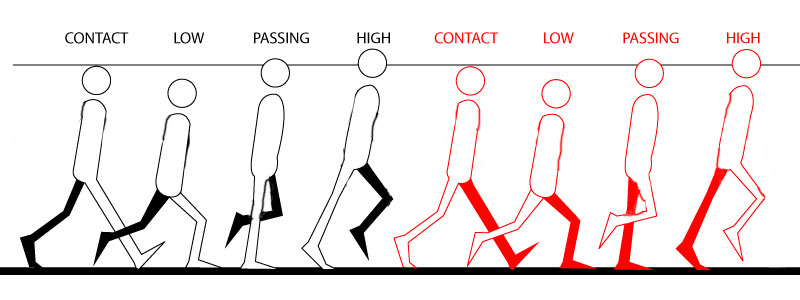
Step 4: Front Arm
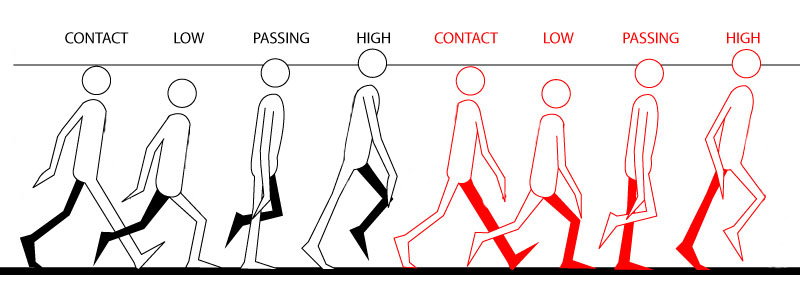
Step 5: Both Arms
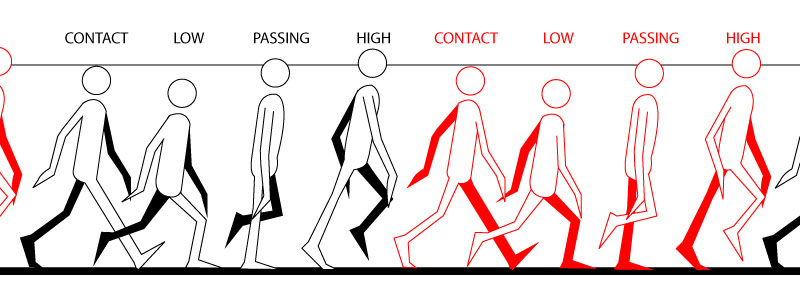
Step 6: Head Tilt (Watch the nose to adjust head tilt)
13 - Flour sack Project first pass. The flour sack project is our opportunity to do frame by frame hand drawn animation. Our challenge is to create a sense of mood and personality with this inanimate object. Watch the example videos, come up with a concept, and then following the tutorial below, create the first pass and keys of your animation.
Example Videos: https://www.youtube.com/watch?v=VMr5p3iWW4Q
https://www.youtube.com/watch?v=3JGgOp38iGE&list=PLkWaRMLUQiNl9T1T1HIu8yW0etDeCUVna&index=4
Example of creating Keys: https://www.youtube.com/watch?v=4CnqzR-38WU
Humorous Example: https://www.youtube.com/watch?v=uh0Rnb9Kj9M&list=PLkWaRMLUQiNl9T1T1HIu8yW0etDeCUVna
-you will hand draw 12 different poses for the flour sack, take a picture and hand in to the classroom, start with the first video tutorial below.
Due Date: April 27
Download the file below and extract to create your storyboard-
| 13_-_flour_sack_first_pass.docx |
| 14_-_flour_sack_breakdowns.docx |
| 15_-_flour_sack_inbetweens.docx |
16 - Character Jump. You will animate your rigged character to do a jump. This can be in place or jumping across a space. When completed you will hand in to the handin folder.
| 16_-_character_jump.docx |
Welcome to Animation 12!
Click on the links below to download the criteria for each of your projects. These will be self-directed at the beginning, and then Mr. Kramer will spend more time with you on developing your personal projects.
Assignment 1 - PSA
| 12_assignment_1_psa.docx |
Assignment 2 - Trailer
| 12_assignment_2_trailer.docx |
Assignment 3 - Animated Short
Example short video below:
| flash_animation_-_kite-[onlinevideoconverter.com].mp4 |
With the time left in the course, develop a story line for an animated short.
You may use either Maya or Harmony, in 2D or 3D.
Ensure that you use:
Moving background
Changing focus
Zoom
Tweens for simple movement of objects
Choose either hand-drawn or rigged cut-out animation
Include an opening title screen and a scrolling credits at the end.
You may use either Maya or Harmony, in 2D or 3D.
Ensure that you use:
Moving background
Changing focus
Zoom
Tweens for simple movement of objects
Choose either hand-drawn or rigged cut-out animation
Include an opening title screen and a scrolling credits at the end.
