About This Course:
Grade 10 Animation is an introduction to the art form of animation. Animation is found in movies, advertising, video-games, computer software, websites and many more that are not mentioned here. Animation can be created manually through puppets, in a 2d format using media like paper drawings, computer drawings or cut paper, in stop-motion using clay, figurines or Lego, or in 3D using 3D computer software. A starting point for all animators is to understand not just how things look, but how things move regardless of the format that you are animating in. As this is an introductory course, we will be working on the foundational skills to create novel and unique animations.
Course outcomes:
The student is expected to develop skills in the following areas:
Evaluation:
In this course you will be evaluated on project work and developmental work.
Developmental work:
-Drawn Cat
-Bouncing Ball
-Animated Butterfly
-Spring
-Motion Paths
-Volleyball
-Walk Cycle
-Flag Animation
Projects:
-Character Creation
-Final Project
Students will complete a Learning Map including evidence for each of the required elements that have been co-constructed as a class.
A copy of the Learning Map can be found here:
Course outcomes:
The student is expected to develop skills in the following areas:
- Students will develop drawing skills with skill building exercises.
- Students will create drawings in 2D utilizing Adobe Flash.
- Students will animate sequences utilizing Adobe Flash.
- Students will create unique images and objects in Adobe Flash
- Students will develop their own character sketches into characters in Flash.
- Students will animate their own character with a walk-cycle.
- Students will create a composite animation as a final project that showcases their work.
Evaluation:
In this course you will be evaluated on project work and developmental work.
Developmental work:
-Drawn Cat
-Bouncing Ball
-Animated Butterfly
-Spring
-Motion Paths
-Volleyball
-Walk Cycle
-Flag Animation
Projects:
-Character Creation
-Final Project
Students will complete a Learning Map including evidence for each of the required elements that have been co-constructed as a class.
A copy of the Learning Map can be found here:
| animation_10_learning_map.docx |
A google doc version can be accessed here:
https://drive.google.com/open?id=19OpT1c2nCi9dAIC9dKNevHYXvnsWhtjQ
Make your own copy, add your information and hand in to I:drive as shown below:
https://drive.google.com/open?id=19OpT1c2nCi9dAIC9dKNevHYXvnsWhtjQ
Make your own copy, add your information and hand in to I:drive as shown below:
Hand-in Information:
All work to be handed in to the following location on completion:
Data (I):/Handin/Kramer/Animation 10
Ensure that you send the FLA file with your name and assignment as the label
Data (I):/Handin/Kramer/Animation 10
Ensure that you send the FLA file with your name and assignment as the label
Resources:
Adobe Animate Shortcuts/Hotkeys
| adobe_animate_shortcuts.docx |
Books:
The Animators Survival Kit - Richard Williams
Making Comics - Scott McCloud
Understanding Comics - Scott McCloud
Adobe Flash CS4 Professional How To's 100 Essential Techniques - Mark Schaeffer
Tezuka School of Animation Vol 1 and Vol 2 - Tezuka Productions
How to cheat in Adobe Flash CS5 - Chris Georgenes
Flash Cinematic Techniques - Chris Jackson
The Natural Way to Draw - Nicolaides
Assignment List:
Drawn Cat
Due by the end of week 1
Bouncing Ball
Create a background and a ball.
Animate the ball rolling and then bouncing in frame by frame animation.
Ensure that you use squash and stretch.
Due by the end of week 1
Animate the ball rolling and then bouncing in frame by frame animation.
Ensure that you use squash and stretch.
Due by the end of week 1
Motion Paths and Camera Movement
Read section #42 and #43 in the file below for written instructions
Due by the end of week 2
Due by the end of week 2
| 201605041440.pdf |
Using motion paths animate an object of your choosing in the following way:
Due by end of week 2
- In a square
- In a circle
- In an arc
- zoom in
- pan across the screen
- fade out
- Add rotation to the object
- Make the object shrink in size or grow along path
Due by end of week 2
Pendulum
Animate a pendulum naturally using frame by frame animation.
Due by end of Week 2
Due by end of Week 2
Animated Butterfly
Read this for the third page of butterfly tutorial!!!!!!
- NOTE:Right Click your butterfly object and choose Create Motion Tween
- In your timeline you will have a blue highlighted bar for 25 frames on your butterfly layer. Drag the right hand side of this to frame 100.
- With the timeline scrubber at the 100 frame, drag your butterfly from it's position on the right of the stage to the left of the stage.
- At this point a motion path (blue line with dots) will appear connecting the start position and ending position.
- Select this motion path by left clicking it and then press delete.
- Insert a new layer on the timeline, name it path.
- Use the Pencil tool (y) to draw a path on the path layer. Set the drawing mode to smooth at the bottom of the toolbar. You can overlap, but only by one pixel so try to be careful.
- When you are happy with the path, double-click it with the black selection arrow then copy it (ctrl c).
- Select the tween span (blue highlighted section in the timeline of your butterfly layer) and then paste the path. It will now show up as a motion path (a blue line with dots) and the butterfly object will be connected to it.
At this point you can move the path around the stage and modify the path by stretching and dragging the line around for the start and finish line.
To make a faster moving butterfly, make your motion tween take less time in the timeline (45-75 frames). To make a slower one, make your motion tween take more time in the timeline(150-180 frames).
Play around and have fun with this, as motion tweens make your life much easier!
Needs:
- One butterfly on a random path
- Random flock of different sizes, smaller ones fly behind the larger ones and travel slower
Due by the end of week 3
Hand Drawn Effects
Example effect shown for hand drawn animation, create your own (fire, water, Character movement etc. for full marks).
Due by end of week 4
Due by end of week 4
| tezuka_hand_drawn_effects.pdf |
Flag animation - Extension
| flag_wave.pdf |
Flag of one colour flapping in the breeze.
Due at the end of week 5
Due at the end of week 5
Flipping Card - Extension
| card_flip.pdf |
| 3d_rotation.pdf |
Add a picture to a card, animate it flipping vertically and one with the image of a playing card(two separate files).
Due by the end of week 5
Due by the end of week 5
Character Creation
Needs:
- Original Character Pencil Drawing (of your own creation)
- Scan drawing into your computer, save as jpeg
- Import picture into flash and redraw as a vector using your own colour scheme
- All components should be on their own layer:
- Head
- Facial Features
- Ears
- Hair
- Torso
- Right Arm
- Left Arm
- Right Leg
- Left Leg
- Right Hand
- Left Hand
- Right Foot
- Left Foot
Eye Movement
Draw your character's face from a front view. Create the symbols for the following features:
- Hat (if applicable)
- Hair
- Eyebrow
- Eye
- Pupil
- Nose
- Mouth
- Teeth
- Tongue
- Ears
- Face
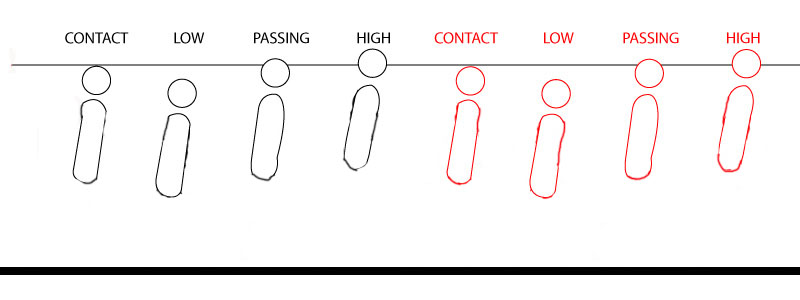
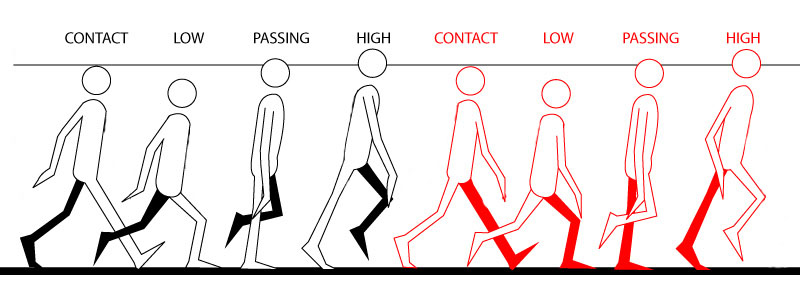
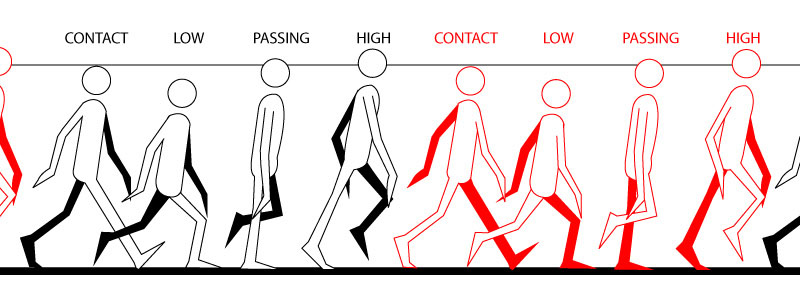
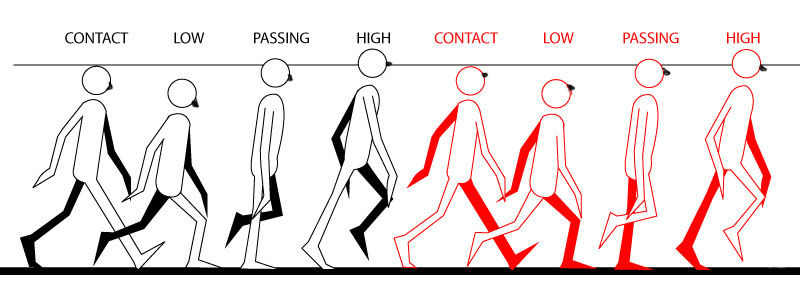
Walk Cycle Instructions: Note the head and floor lines! (this should be over 24 frames)
Look below in each step for video tutorials.
Using the character you created in the last assignment,
Using the character you created in the last assignment,
- Rig the character into separate parts (upper,lower leg, upper lower arm, feet, hands, head etc.)
- Move the pivot points to appropriate locations(elbows, shoulders, ankles)
- Frame by frame animate a loop-able walking cycle
- Add an extra move: Jump, slide, turn around etc.
Step 1: Body and Head
Step 2: Front Leg
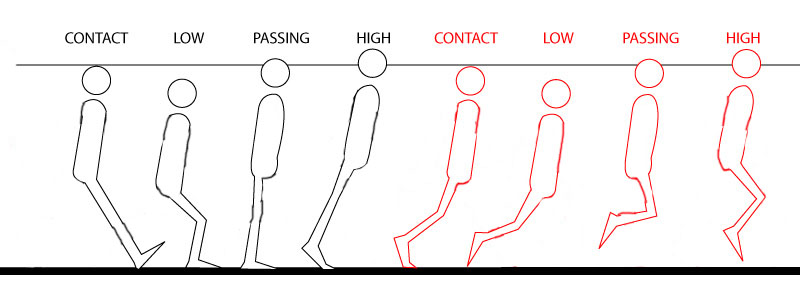
Step 3: Both Legs
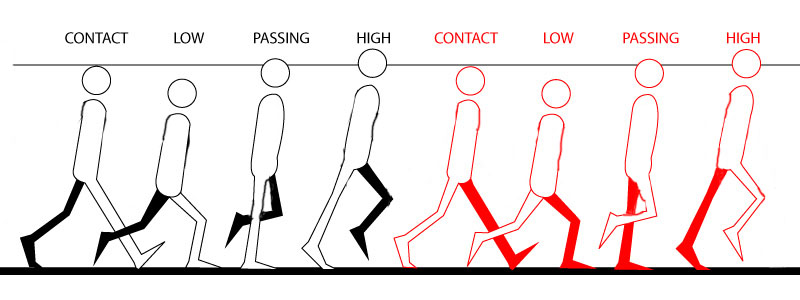
Step 4: Front Arm
Step 5: Both Arms
Step 6: Head Tilt (Watch the nose to adjust head tilt)
| text.pdf |
| starwars_text.pdf |
Animate text in the following ways:
- Have it animate to stage one letter at a time
- Have it move sideways like a marquee
- Star wars text
- Fly randomly to create a word
Animated Short
Introduction to Storyboarding. Create a 2 X 3 Storyboard of your animated short. Remember that even though this is a short clip you are still telling a story for the audience. What is the setting? Are your characters happy? Are they aggressive and competitive? Are they sad, or angry? What is the rising tension (why does your audience want to keep watching)? What is the climax of the conflict? How do you resolve the story in the end? Create the storyboard first and show to Mr. Kramer before you start to animate.
| storystructure.pdf |
| example_storyboard.jpg |
| storyboard_16_x_9.docx |
Spinning Coin
| coin_flip.pdf |
Add a picture to a circle, animate it spinning sideways in place. Create a background and setting for this action.
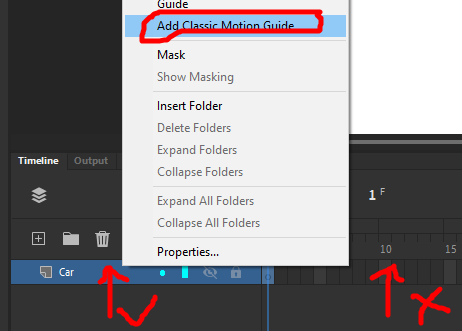
Car movement along path (or other character)
Animate a car (or other character seen from above) driving along a roadway or other path.
- Entire scene must be created
- Create a cloud of dust behind the car or character (make sure the dust doesn't follow it!!!!)
- Car(character) will start on screen from a start then drive off of the screen after making at least two turns.
- Note: On step 3 you need to right-click ON THE LAYER NAME! Not the frames in the timeline to select "Add Classic Motion Guide". Shown Below:
Text
| text.pdf |
| starwars_text.pdf |
You will need to create:
- Flying text
- Spinning text
- StarWars Text
- One animated text set of your own design.
Shadows
| shadows.pdf |
Create the following shadows:
- Simple shadow on a static object
- Drop shadow that follows an object
- Create a perspective shadow
Dolly Shot Through Window
For this project you will create a scene that has foreground, background and mid-ground elements
A good example of this will be the outside of a house being the foreground with hedges, a tree etc. then the wall of the house with the window is the mid-ground, and then finally the interior of the house is the background. You can add elements in the interior as needed, and include a character as well.
The shot itself will be the dolly shot of the camera moving forward through the window into the interior of the house. This action creates a sense of changing scenes, and can also be used to build tension and give the perspective of a character entering the house.
You do not need to use a house, feel free to use different elements in your project: a car, a cave etc.
As the camera "dollies" forward, make sure that you have the elements of the scene move at different rates (like you did with the parallax background).
Closer elements will move faster, and further elements will move slower.
This will give a 3d like effect. In animation we call this effect 2.5d
Final Project
Using the information that you have learned, storyboard a 15-20 sec animation (360 - 480 frames).
Check in with Mr. Kramer to ensure that your story is achievable in the time available.
Animate a complete animation from your storyboard, if you make changes edit your storyboard as well.
Example themes you may consider (but are not limited to):
Due by the end of the course.
Check in with Mr. Kramer to ensure that your story is achievable in the time available.
Animate a complete animation from your storyboard, if you make changes edit your storyboard as well.
Example themes you may consider (but are not limited to):
- Skateboard accident
- Buying, enjoying and then dropping an ice-cream cone
- Dancing
- Skydiving
- Sports
Due by the end of the course.
| final_assessment.doc |
